| Back to Back Issues Page | ||||||||||||
 |
||||||||||||
|
PWL#156, 3rd Generation AHSS, Resistance Welding Tips, Cold Spray Characterization, Worries August 01, 2016 |
||||||||||||
| We hope you will find this Letter interesting and useful. Let us know what you think of it.
PWL#156
PWL#156, Third generation Advanced High-Strength Steel, Reminder of Resistance Welding Tips, Filler Metals for Stainless Steels, Cold Spray Characterization, Bulletin_121 Resources on Aluminum - Metals Part 5 for building an Encyclopedia Online, Worries on the inadequacy of new Welding Engineers and much more...
August 2016 - Practical Welding Letter - Issue No.156
Important Notice Check the New Mid June Bulletin including Resources on Metals, Part
5.
DON'T USE REPLY to send your messages! Use the Contact Us form instead. This publication brings to the readers practical answers to welding problems in an informal setting designed to be helpful and informative. You are urged to pass-along this publication to your friends, if you like it, and if you think they may enjoy it. The addresses reported hereafter were live and correct at the time of their publication. Note: References to articles or other documents are given here in one of two forms. If they are URL's (Uniform Resource Locator), which is the analogue of an address, they begin with "http://..." or "www.". If the information is important to you as we hope, you may save the selected pages in a suitable folder on your Computer for easy reference.
1 - Introduction 2 - Article - Third generation Advanced High-Strength Steel 3 - How to do it well: Resistance Welding Tips 4 - Filler Metals for Stainless Steels 5 - Online Press: recent Welding Related Articles 6 - Terms and Definitions Reminder 7 - Article: Cold Spray Characterization 8 - Site Updating: Bulletin_121 - Resources on Aluminum 9 - Short Items 10 - Explorations: beyond the Welder 11 - Contributions: Worries, by Anthony Rangus 12 - Testimonials 13 - Correspondence: a few Comments 14 - Bulletin Board
2 - Article - Third generation Advanced High-Strength Steel
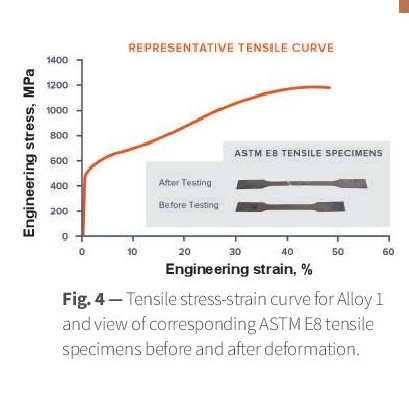
The automotive industry is obviously the one where these demands are addressed most aggressively. An article, published at page 22 in the July-August 2016 issue of Advanced Materials and Processes (AM&P), a magazine of ASM International, reports on recent advancements achieved to improve on current types of Advanced High-Strength Steels (AHSS). The new approach is taken at NanoSteel, Providence, R.I., by using conventional steel constituents in novel ratios, while new mechanisms are harnessed for creating the nanoscale structure. The results consist in a mixed microconstituent structure, enabling the sheet to exhibit the desired AHSS properties. The article explains that "In the new structure, two distinct microconstituents act synergistically on a local level during deformation. By varying the volume fraction of the microconstituents in the final sheet material, many different outcomes for strength and ductility are possible". One such material, described in some detail, is called Alloy 1. The composition and the processing of the new alloy produce a mixed microconstituent structure. It consists in a mixture of two components (~50% each) that "provides strength due to the combination of nanoscale grain sizes and nanoprecipitation with both the austenite and transformed ferrite contributing to ductility". Once processed, Alloy 1 results in ultimate tensile strength of roughly 1200 MPa with average elongation of 50%, which is well within target properties. It is expected that these new developments will meet the current lightweight goals of the industry. Interested readers are urged to seek the article reported.
[From AM&P July-August 2016, page 23]
3 - How to do it well: Resistance Welding Tips
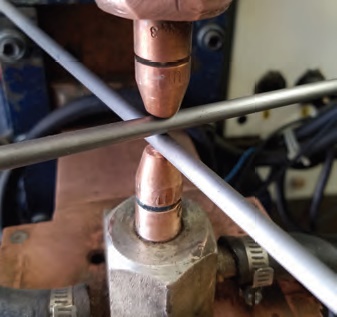
The July 2016 issue of the Welding Journal includes, in the Q&A column at page 22, a few tips that were provided as answers to troubled inquirers. This is basic information that may need being reminded, from time to time. The author, to the person asking why the strength of welded spots is found drastically reduced after about 50 pieces, suggests to check the cooling water system, that may become inefficient with time if the water passage is reduced. The result of heated electrodes is increased resistance and lower current. Also electrical secondary connections may be a culprit of bad results, in need of regular maintenance. Another answer addresses the question of why reduced force increases weld strength. As above the reason is that lower force increases resistance and weld heat: but the additional result of applied force is forging the joint and keeping the nugget from ejecting metal expulsions. To the inquirer asking why results change in different work shifts, the author explains that the nominal voltage of the grid is not a fixed value, but varies with consumption by other customers. To address this situation, automatic voltage compensation systems are available and recommended. Finally, when long parts are introduced in the throat of resistance welding machines, the impedance on the machine secondary circuit is increased. Therefore a lower current is flowing. Besides rotating the parts if possible, to control the metal in the throat, the best solution suggested by the author is to install a constant current function. Ironically, the author found that some shops with new or renewed control equipment were not aware of the constant current mode available in their machines. Periodic refreshing of the knowledge of the personnel by an external tutor should be probably be adopted to avoid production problems. Readers working with this type of equipment could profit by seeking the article pointed at above.
[From the Welding Journal, July 2016, page 23]
4 - Filler Metals for Stainless Steels
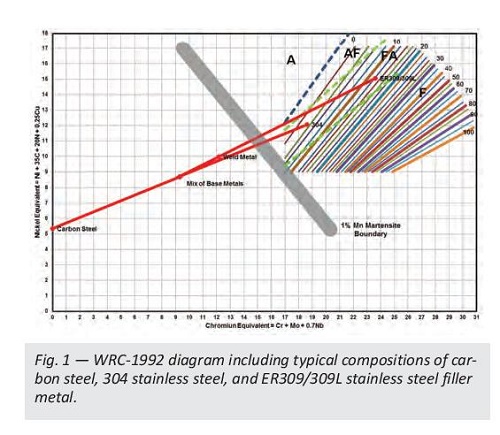
Two articles on Filler Metals for Stainless Steels, that might be of interest to our readers, were published in the July 2016 issue of the Welding Journal. The first is found there at page 18 in the Stainless Q&A column by Damian J. Kotecki, one of the most admired world experts on these subjects. He was asked on the reasons for the repetitive failures of the inquirer's welders in almost all bend tests of (GTAW) butt joints welded specimens of 304 stainless to carbon steel 1/8 in. thick, with a maximum root opening of 1/16 in. using ER309/309L filler metal, to qualify welders for complete joint penetration. The inquirer had thought that, using the "AWS B2.1-1/8-010:2015, Standard Welding Procedure Specification (SWPS) for Gas Tungsten Arc Welding of Carbon Steel (M1/P1) to Austenitic Stainless Steel (M8/P8) through 10 Gauge, in the As Welded Condition", he would be quite sure of obtaining good results. The Author starts his answer with the observation that the root of the problem lies in the fact that, in GTAW there is no relationship between filler metal deposition rate and welding current. The welder adds filler metal only to keep from having a concave bead shape, and when the joint closes, less filler metal is required and dilution increases. This means that a root opening of 1/16 in. maximum, will result in high dilution for complete joint penetration. A table of the main elements compositions at several dilution values is given in the article, to show calculated fusion zone compositions at several dilution levels. The reader is then instructed to follow the composition of several weld metal deposits at different dilution values, and to find out where they lay on the WRC-1992 diagram. In the figure shown, a transversal band is drawn, indicating the 1% Mn Martensite Boundary. Weld metal compositions that lie below and to the left of this Boundary, predict that the weld metal microstructure will be martensitic and the weld metal therefore will be brittle. Such a composition would be expected to develop transverse cracks during a longitudinal face bend or root bend test. The remedy suggested by the Author is to ensure that the weld metal composition will always lie at less than 40% dilution by expanding the root opening up to the maximum allowed by AWS B2.1, namely to the sheets thickness (1/8 in.). Another approach would be to grind or machine a single V-groove or single bevel joint on the carbon steel side so that more filler metal would be required to fill the joint. The Author remarks that the inquirer’s experience demonstrates a limitation of simply following a SWPS. The clause titled "User’s Responsibility" in AWS B2.1-1/8-010:2015, requires "supplementing the SWPS with appropriate performance qualification tests and sound engineering judgment". This highly technical answer does not address the standard practice to "butter" the carbon steel side with stainless steel weld metal before welding the two sheets. The reason might be that buttering would be an additional expense, although doing it would possibly eliminate qualification problems. The explanation of this technique can be found in our page on Weld FAQ, under the heading: "Stainless to Mild Steel Welding". In general the problem will be to weld together two sheets along the sides where the thickness of the two is equal or similar, as in the case above. Readers working with stainless are urged to seek the original article pointed at above. The second article on Selecting Filler Metals for Stainless Steel is published at page 32 in the same Welding Journal issue. The various headings address common questions that users may ask when confronting certain situations. As a reminder of basic technical information this article should be sought as it may enlarge understanding and establish good practices for successful welding.
[From the Welding Journal, July 2016, page 19]
5 - Online Press: recent Welding related Articles Effective component protection with Plasma Transferred Arc welding process UK Organisations Take Lead in Innovative Laser Welding Research and Development Project WELDING: Laser Welder for Large-Format Plastic Parts Welding fume hazards Hot crimping delivers cost-effective, efficient joining of enameled copper wiring 6 - Terms and Definitions Reminder Nugget is the weld metal joining the workpieces in spot, seam or projection resistance welding. Purge is the introduction of a protective gas to remove contaminants from a system or to avoid oxidation or other surface attack. Root penetration is the distance the weld metal extends into the joint root. Stickout is the length of unmelted consumable electrode extending beyond the end of the gas nozzle. Tie-in, in fusion welding is the junction of weld metal and base metal or prior weld metal where fusion is intended. Upset is a bulk metal deformation resulting from the application of pressure in welding. May be measured as a percent increase in surface area, a reduction in length, a percent reduction in lap joint thickness or a reduction in cross wire stack height. Vacuum Plasma Spraying is a process variation using a plasma spraying gun confined to a stable enclosure that is partially evacuated. Weld Face is the exposed surface of a weld on the side from which the weld was done.
7 - Article: Cold Spray Characterization
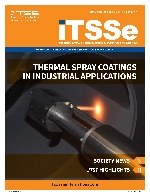
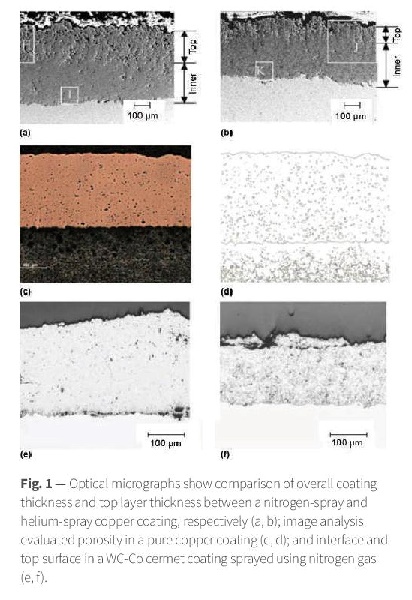
The new issue (July-August 2016) of iTSSe (International Thermal Spray & Surface Engineering) the official newsletter of the ASM Thermal Spray Society, is included as an insert in the last AM&P Magazine. It is also downloadable separately from the link: At page 6 of the insert, corresponding to page 36 of the AM&P Magazine, an article highlights optical microscopy methods used for development and characterization of cold spray techniques. In particular the thickness, the interface and the porosity of cold spray specimens must be assessed to judge on the quality of the process. It must be understood that, in order to obtain reliable information from optical microscopy, one must master the specimen preparation techniques, including cutting, grinding, polishing and etching. Inadvertent cutting could cause delamination, so that sometimes waterjet cutting should be preferred. As published in previous issues (PW#151, PWL#154), cold spray is recently gaining approved status for repairing and rebuilding damaged aircraft components which cannot be fusion welded, because of adverse consequences of heating on their properties. The reported article is adapted from a chapter of a new book (ASM 2016) titled Interested readers are urged to seek the article reviewed above.
[From iTSSe July 2016, page 6 - AM&P July 2016, page 36] 8 - Site Updating: Bulletin_121 - Resources on Aluminum The Page of this Month introduces more information on Resources on Metals, Part 5 aimed to enrich your Materials Encyclopedia built from articles gathered online. This page is dedicated to Aluminum. Due to the various types of Aluminum Alloys available, their different properties and applications, it is most important for informed professionals to have an updated database where information is right on their fingertips. It is therefore recommended to busy readers to dedicate the required time to perform gathering and organizing in a practical way the pages available from many sources. Also brochures and catalogs from commercial companies may provide useful information, despite the built in bias they may provide for advertising purposes. To download all the pages introduced in Resources on Metals, Part 5, dedicated to Aluminum, Metallurgy, properties, applications and welding procedures click on Bulletin 121. Then organize the downloaded material in indexed folders, arranged for easy retrieval of information.
9 - Short Items
9.1 - Abrasive Wheel is a grinding wheel composed of an abrasive grit and a bonding agent. 9.2 - Bond is: (1) In grinding wheels and other relatively rigid abrasive products, the material that holds the abrasive grains together. 9.3 - Cation is a positively charged ion that migrates through the electrolyte toward the cathode under the influence of a potential gradient. 9.4 - Deformation limit in drawing, is the limit of deformation reached when the load required to deform the flange becomes greater than the load-carrying capacity of the cup wall. The deformation limit (limiting drawing ratio, LDR) is defined as the ratio of the maximum blank diameter that can be drawn into a cup without failure, to the diameter of the punch. 9.5 - Edging is: (1) In sheet metal forming, reducing the flange radius by retracting the forming punch a small amount after the stroke but before release
of the pressure. 9.6 - False Brinelling is: (1) Damage to a solid bearing surface characterized by indentations not caused by plastic deformation resulting from overload, but thought to be due to other causes such as fretting corrosion.
10 - Explorations: beyond the Welder Human Brain Mapped in Unprecedented Detail Miniature Space Telescope Could Boost the Hunt for "Earth Proxima" Atom Wranglers Create Rewritable Memory The Air Conditioner That Makes Electricity Rise of the Ag-Bots Will Not Sow Seeds of Unemployment
11 - Contributions: Worries, by Anthony Rangus I see a big problem with the so called welding engineers running around the world. They have welding engineering degrees; they claim to read the Welding Journal and the myriad other journals dedicated to welding, fabrication NDE etc. around the world, but many invariably fail to retain the practical knowledge they glean from their reading or claimed reading. Most anybody can get a welding engineering degree slapped onto them, but the real challenge is for them to accept that there are tons of more highly educated and more experienced folks out there. I have noticed, over the last 20 - 30 years, that what the so-called welding engineers I have dealt with from fabricators and operating companies, are extremely lacking is basic welding process and welding codes knowledge.
All you need to do is look at all the welding procedures out there that have a CWI stamp, or a DNV stamp or whatever stamp on them, with a name and initials. And then take that same welding procedure and do a strict applicable code review as to what was mandated to be addressed in the procedure and what was mandated to be recorded in the qualification documentation. The results are pretty astonishing. All the welding procedure/procedure-qualification codes and standards I deal with (ASME, AWS, ISO, EuroNorm, Australian etc.) are ALL very specific as to what MUST be addressed in a procedure and what must be recorded in a procedure qualification. Granted, this is cookbook stuff, but the reasoning behind this cookbook approach is well founded. Consistency: whether the deposited weld metal is as strong and as ductile as the base material; the applicability to other similar base materials etc. Yet what you see is the so-called CWI or whoever, has decided that certain welding variables that are mandated in the code do not apply to their circumstances. But they still claim 100% compliance. What they failed to understand is that the SOLE purpose of a welding procedure is to provide the welder the information he or she needs to deposit a weld that meets the applicable fabrication code. And the SOLE reason for a procedure qualification is to show that if the welding procedure variables are followed, the deposited weld metal will be as strong, as ductile and in some circumstances as notch-tough as the base material being welded. Thus consistency is assured.
One perfect example is the preheat requirement in ASME Section IX. Yet one continues to see the procedure state "ambient" and the qualification show "No Preheat" or "ambient", none of which are a temperature as mandated by the code. What this tells me is a COMPLETE lack of code and standard knowledge. I wonder how many welding engineers have sat down and completely read ASME IX, or AWS D1.1, or ASME B31.3, or ASME Section VIII or the hundreds of other welding and fabrication codes out there, to fully understand what is required. My guess is very few.
Anthony Rangus Note: I am very thankful to my friend and mentor Mr. Anthony Rangus for his important Contribution to this publication. I would say it is not a rant: it is rather a personal view on the problematic situation he finds in our profession. One feels the sincere worry that safety and stability of many large projects may be undermined by weak spots in danger of failure sometime in the future. Unfortunately the diffusion of this publication is so limited that it is quite improbable that any action will be taken as a result of the above warning. Nevertheless if all that agree will push the argument in their environment, it might reach a level of urgency that will prompt the introduction of improvements. Readers' comments are sought. 12 - Testimonials On Wed Jul 06 16:59:07 2016, the following results were submitted from the "Form 5" on welding-advisers.com: Name: Ken Ferris 13 - Correspondence: a few Comments My friend and mentor Mr. Anthony Rangus, who provided the Contribution above (11), sent also the following comment referring to a review of an article published in the last issue of this letter (PWL#155) at (4). "I was somewhat perturbed by the article "Welding Austenitic SMO 254 Stainless Steel" in the Welding Journal. What I consider totally incorrect is the remark made by the author about the extreme difficulty of welding duplex stainless steels versus 254 SMO. Duplex & super duplex stainless steels are no more difficult to weld than 254 SMO, as long as you apply very similar restrictions shown in the article for 254 SMO. Like heat input control; interpass temperature control; shield & backing gas choices; weld filler material choice etc. My employer (Bechtel - Materials Engineering Technology), and many other E&C firms have been successfully welding duplex & super duplex stainless steels for many years. Take a look at the allowable stress tables in the various ASME Codes and do a comparison with those allowable at temperature. The author was flat wrong!" Note: It seems to me fair to remind hereafter the reasons adduced by the article author: "... material SMO 254 (UNS 31254), [was] chosen for its ability to provide excellent resistance to corrosion (PREN>40) and pitting, for its high impact toughness, resistance to chloride stress corrosion cracking, and excellent workability and weldability." Furthermore, other factors like price and/or availability may have played a role in the decision. 14 - Bulletin Board 14.1 - QNDE (Review of
Progress in Quantitative Nondestructive Evaluation). 14.2 - Digital Imaging 2016. 14.3 - Ultrasonics for NDT 2016.
See you next time...

Watch - The Video:
and also
BUILT BY: Click on this Logo NOW! No better way to get to know SiteSell, Specific questions about SiteSell?
Copyright (©) 2016, by Elia E. Levi and

Back to Past Issues of PWL.
|
||||||||||||
| Back to Back Issues Page |
