| Back to Back Issues Page | ||||||||||||
 |
||||||||||||
|
PWL#165, New iTSSe, New Cutting Torch, Al Filler Metal, New HT PRO May 01, 2017 |
||||||||||||
| We hope you will find this Letter interesting and useful. Let us know what you think of it.
PWL#165 PWL#165, New issue of International Thermal Spray and Surface Engineering, Metal Removal with a New Cutting Torch offering FlushCuts consumable tip, Aluminum Filler Metal Questions, New issue of HTPro - the Bulletin of the Heat Treating Society, New developments towards automatic feedback control for robotic GMAW, Updated page on Welding Certification and much more... May 2017 - Practical Welding Letter - Issue No.165DON'T USE REPLY to send your messages! Use the Contact Us form instead. This publication brings to the readers practical answers to welding problems in an informal setting designed to be helpful and informative. You are urged to pass-along this publication to your friends, if you like it, and if you think they may enjoy it. The addresses reported hereafter were live and correct at the time of their publication. Note: References to articles or other documents are given here in one of two forms. If they are URL's (Uniform Resource Locator), which is the analogue of an address, they begin with "http://..." or "www.". If the information is important to you as we hope, you may save the selected pages in a suitable folder on your Computer for easy reference. 1 - Introduction 2 - Article - New issue of iTSSe 3 - How to do it well: Smart Plasma Arc Cutter 4 - Aluminum Filler Metal Questions 5 - Online Press: recent Welding related Articles 6 - Terms and Definitions Reminder 7 - Article: New issue of HTPro 8 - Site Updating: Welding Certification 9 - Short Items 10 - Explorations: beyond the Welder 11 - Contributions: Monitoring GMAW 12 - Testimonials 13 - Correspondence: a few Comments 14 - Bulletin Board
2 - Article - New issue of iTSSe
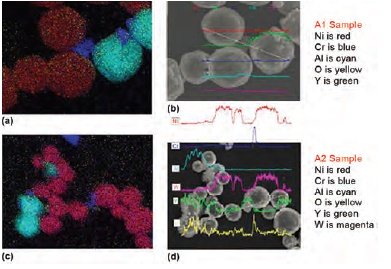
The new issue 1, Vol. 12, dated February/March 2017, of the International Thermal Spray and Surface Engineering, the official newsletter of the ASM Thermal Spray Society, publishes a few articles likely to be of interest to curious readers in search of specific information. The newsletter is distributed as an insert in the Digital Edition of Advanced Materials and Processes (AM&P), an ASM International Publication, of February/March 2017. The first article describes a new test titled: Hyperaccelerated Degradation of an Aerospace Coating. The main causes of degradation of the topcoat at its interface with the environment include high humidity, extreme temperatures, UltraViolet radiation and exposition to ozone. Traditional testing methods require very long times to provide results for comparing performance of different coating systems. A new coating HyperTest method was developed to permit to reduce exposure time and still provide surface sensitive analytical techniques for understanding degradation. The sample, placed within a vacuum chamber is irradiated from a UV lamp light source. Sensitive analytical techniques, described in some detail, are used to understand the degradation of the irradiated topcoat surface.More research is being undertaken. Another article reviews the method used to characterize Cold Spray. The application of techniques using the Scanning Electron Microscope is exposed in some detail. Both the powders and the sprayed layers are examined and analyzed. Specific coating tests are briefly reported. In the same issue a few other articles published elsewhere are briefly summarized. Although at the time of this publishing, the link to the digital edition of the above publication is not yet reported, it is expected to appear in the near future, in the list of published issues, in the website page: http://www.asminternational.org/news/magazines/itsse
Energy-dispersive x-ray analysis mapping along with [From iTSSe FebMar 2017 - page 9] 3 - How to do it well: Smart Plasma Arc Cutter
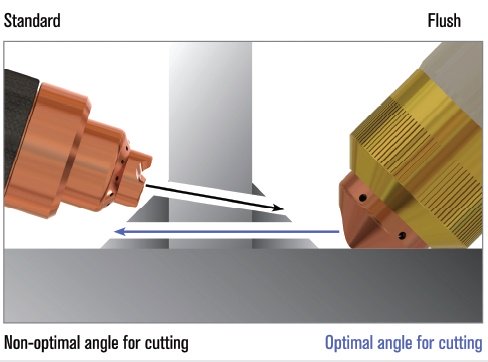
In the Technology section, an article titled: "Cutting it Close: Redesigned Consumable Offers Flush Cuts", published at page 56 of the April 2017 issue of the Welding Journal, describes a new design of the consumable tip of plasma arc cutting torches. It starts with numbering the pitfalls of traditional torches that don't allow close enough positioning to the parts to be cut, requiring long and costly grinding time to complete preparation. The study revealed that the problems were caused by the fact that traditional plasma consumables tips of cutting torches are perfectly symmetrical, with a single bore positioned at the center of the nozzle and a high-velocity swirl of air to focus a plasma stream straight out of the front of the torch. It took apparently years of prototyping and testing until the developers closed on a design they called FlushCut: it includes an asymmetric shield with a surface-guiding flat and an off-centered nozzle bore. It allows operators to place the nozzle bore and the plasma arc in an optimal location for flush cuts. Experience with its use showed additional advantages relative to carbon arc gauging and oxyfuel cutting. The new design, when used properly, should permits clear cuts at optimal positions, protecting from unintentional damage and saving costly grinding. Like any new application it needs a study of the base metal configurations most likely to profit from the innovation and certainly the accumulation of some experience, before gains can be achieved. Interested readers are urged to seek the original article and to check if, in their own context, it could provide real benefits.
Comparison of a standard and flush plasma arc delivery [From the Welding Journal - April 2017 - page 58] 4 - Aluminum Filler Metal Questions
In his periodic column published in the April 2017 issue of the Welding Journal, the renowned expert Tony Anderson continues the review of aluminum filler metals selection by answering to inquirers' questions. The first one asks if, for GTA Welding of aluminum alloy 2219 base metal, could strips cut from the same be used as filler rods. The short answer is no. Typically that base metal is welded using filler metal 2319, because it contains grain refiners, and also because selected manufacturing procedures (as explained further down the original article) provide a product capable of assuring improved strength and lower crack sensitivity. The second question poses the same query as before for base metal 6061. Here again the answer is no. This material cannot be welded without filler (i.e. autogenously) because it is extremely crack sensitive. It must be welded with a filler metal with a quite different chemical composition, like 4043 or 5356, depending on further considerations (like strength, ductility, elevated temperature service, color match after anodizing, and postweld heat treatment). Interested Readers are urged to seek the original article quoted above. 5 - Online Press: recent Welding related Articles Is submerged arc welding the right process for you? Audi builds a stunning new body shop for latest alloy A8 Gases for laser cutting and welding processes Global Friction Stir Welding Market To Exceed US$ 887.0 Mn By 2024 Steel industry looks for loopholes in Buy American provisions Fabricators optimistic about near
term 6 - Terms and Definitions Reminder Reducing flame is an oxyfuel gas flame with an excess of fuel gas Shear strength of a single resistance spot weld is calculated by dividing the pulling force by the cross sectional area of the nugget in the plane of the faying surfaces. The actual failure can occur outside of the said area. Test coupon is a weld, braze or solder assembly used for procedure or performance qualification testing. U-groove weld is made in a groove joint prepared in the base metal by machining the shape of a section in the form of capital U. Virgin Flux for submerged arc welding is unused flux produced from new raw materials. Weave Bead is produced by oscillating transversely the energy source as it progresses along the weld path. X-shaped edge preparation of a joint is obtained by approaching two opposed triangular section beveled profiles. 7 - Article: New issue of HTPro
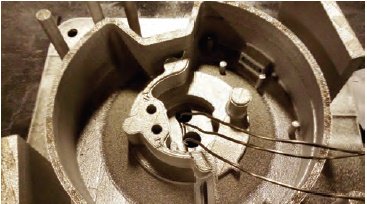
The new Issue 1 Volume 5, dated February/March 2017, of HTPro, the Bulletin of the Heat Treating Society of ASM International, is distributed as an insert in the Digital Edition of Advanced Materials and Processes (AM&P), an ASM International Publication, of February/March 2017. It contains a few articles likely to be of interest to curious readers, and the summary of a few research programs carried out at the Center for Heat Treating Excellence (CHTE), located at Worcester Polytechnic Institute (WPI) in Massachusetts. The first article highlights the development of Vacuum Heat Treating for Additive Manufacturing. The author imagines future developments consisting in 3D printing parts with different materials at different locations, like gears, where "the pitch of each tooth could be imbued with high hardness, gear tooth flanks with improved wear resistance, ductility in the core, and improved corrosion resistance everywhere else". In particular AM will possibly displace, in certain cases, the need of joining, if different materials could be deposited at separate locations in the same part. Another article reports on success in applying analysis to quenching, using both experimental and computational fluid dynamics (CFD) methods to build models that are proving to be quite accurate in quenching process simulations. First the investigators had to develop an experimental facility to collect flow boiling heat flux data for vaporizable quenchants. Raw data collected are temperature values obtained from thermocouples inserted below the surface of a copper coupon. Cooling curves were constructed for locations with the least and greatest average deviations and found in close agreement over the entire cooling range. Interested readers are urged to seek the original articles. At this time the link to the digital edition of this publication is not yet reported, but it is expected to appear in the near future, in the list of published issues, in the website page: http://www.asminternational.org/news/magazines/htpro
AM components often include holes to give thermocouples [From HTPro FebMar 17 - page 11] 8 - Site Updating: Welding Certification In the last issue of this publication we reported (7) on the various AWS initiatives for encouraging interested individuals to check their present position and determine if, improving their preparation as necessary, would open their chance to obtain the most valuable Welding Inspector Certification. As this information risks to remain concealed if not advertized, we added a reminder in our website Welding Certification page with a direct link to PWA#164 for curious readers wishing to update their information on the help provided by AWS for improving their career prospects. The link is now available in the updated
website page. Building and growing a welding career is a dynamic process that should never stop. Every stage prepares for future more demanding and satisfying achievements. 9 - Short Items 9.1 - Magnetic-Particle Inspection is a nondestructive method of inspection for determining the existence and extent of surface cracks and similar imperfections in ferromagnetic materials. Finely divided magnetic particles, applied to the magnetized part, are attracted to and outline the pattern of any magnetic leakage fields created by discontinuities. 9.2 - Nodular Graphite appears in nodular (rounded) form as opposed to flake form in iron castings. 9.3 - Overaging means aging under conditions of time and temperature greater than those required to obtain maximum change in a certain property, so that the property is altered in the direction of the initial value. 9.4 - Paramagnetism is a property exhibited by substances that, when placed in a magnetic field, are magnetized parallel to the field to an extent proportional to the field (except at very low temperatures or in extremely large magnetic fields). 9.5 - Quench annealing refers to an austenitic ferrous alloy and is performed by solution heat treatment followed by rapid quenching. 9.6 - Rate of Strain Hardening is the Rate of change of true stress with respect to true strain in the plastic range.
10 - Explorations: beyond the Welder Fountain of Youth? Young Blood Infusions “Rejuvenate” Old Mice We Just Breached the 410 PPM Threshold for CO2 An Old Rock Could Lead to Next Generation Solar Cells Records Found in Dusty Basement Undermine Decades of Dietary Advice Getting Medieval on Bacteria: Ancient Books May Point
to New Antibiotics 11 - Contributions: Monitoring GMAW
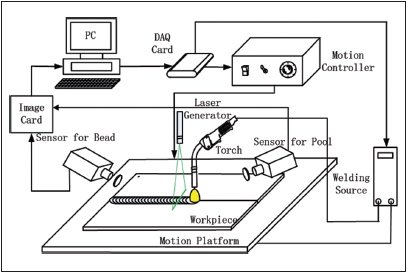
In view of assuring quality control by providing automatic Gas Metal Arc Welding control for robotic applications, a monitoring system was developed for the vision based online measurement of weld bead and weld pool geometry. A detailed research paper on the description of the system and its workings was published in the research supplement of the April 2017 issue of the Welding Journal at page 133-s. The experimental system design is illustrated and described. The vision-based sensing system was the basis for the online measurement of the weld pool and weld bead geometry. It consisted of four parts: GMAW system, moving system, monitoring system including active and passive vision parts, and industry personal computer, which was the core of the system. The vision-based sensing system consisted in an active vision sensor and a passive vision sensor. The active sensor was used for weld bead geometry measurement. The passive vision sensor was used for the pool geometry measurement. As the pool geometry reflects the current weld penetration state, it was also used as an input signal to revise the model parameters and improve the prediction accuracy of the model. Weld pool and bead images were obtained by using the designed vision sensing system. Image acquisition and processing is described including the extraction of weld pool trail, width and length by applying selected algorithms. To verify the validity of the image processing algorithm, manual and detected values were compared, and the mean square errors were calculated as the criterion to evaluate the precision of both the passive and the active algorithm. The boundary points of the bead were extracted by seeking the positions of the sharp gradient changes in the curve, and the top of the bead was also extracted by the maximum of the curve. The width and the height ofthe weld bead were finally calculated through the boundary points and the top position of the bead. The verification test showed that the proposed image processing algorithm was reliable, and that detection precision can meet the requirement of the GMAW process. Future work will include establishing the relationship between the backside melting width and the features of weld pool and weld bead, and establishing a closed-loop control system for the GMAW process. From this research one learns that great progress was made in vision image acquisition and processing but that the road to automatic feedback control of GMAW is still in the future. Interested readers are urged to read this research paper at:
Schematic diagram of the experimental system. [From the Welding Journal - April 2017 - Page 134-s] 12 - Testimonials On Tue Apr 11 16:24:49 2017, the following results were submitted I'm Billy Canning with the Canadian Welding Association. I'm wondering if we could use one of your articles on Weld Repair in our next edition of Engage. You'll be fully attributed. (http://www.thefabricator.com/article/arcwelding/weld-repair-analyze-the-failure-before- attempting-the-repair) I answered: Hi Billy, 13 - Correspondence: a few Comments Our kind observer and mentor Anthony Rangus sent the following comment: Interesting article by George Boykin. I am not sure how truly practical it would be to use his logbook or any logging method. In both fabrication shops & in the field, in any one day, a welder may deposit weld metal in 50 - 100 joints covering everything from plate butt welds, piping butt welds, attachment welds, branch connection welds etc. When I welded in the Southern California shipyards, everything was production. I could go from hull welding to double-bottom welding to mast welding in any one day. And if you did not mostly use up a 50 pound can of SMAW electrodes in a shift, you were a shirker. And when I welded for a heavy mining equipment manufacturer, if you did not burn at least a 50 pound spool of FCAW wire in a shift, you were not cutting it. There are pipe shops and structural steel shops that push out hundreds of tons of product per day. As a production welder, how could you keep track of everything? Also, if I was Mr. George Boykin's supervisor or an inspector, I would not sign anything to do with what he welded unless I personally observed him perform the work or if there was shop or field paperwork that tracked his production. And even if there were shop or field paperwork, why as a supervisor or inspector would I stop everything to verify his production. If I did, I would get absolutely nothing done as to my job responsibilities. I am not critical of what he suggests, but he should have put it in context as to where the log book might work. To the above, I answered: Thank you for your comment. 14 - Bulletin Board 14.1 - 19th International Conference on Joining Materials. 14.2 - Westec. 14.3 - 25th Annual Conference on Composites and Nano Engineering.
See you next time...  Watch - The Video: and also BUILT BY: Click on this Logo NOW! No better way to get to know SiteSell, Specific questions about SiteSell? Copyright (©) 2017, by Elia E. Levi and Back to Past Issues of PWL. | ||||||||||||
| Back to Back Issues Page |
