Preview3:
Underwater Different
Skills and Techniques
Introduction
Preview3: This is the third and last extract from the proposed book.
We are glad and proud of having been authorized by the Author
of a very important Book on Underwater Wet Welding, titled
"A Welder's Mate"
David J. Keats
Dip.Eng., L.Eng., Sen.M.Weld.I
International Welding Technologist / Senior Welding Inspector
of Speciality Welds Ltd.,
to publish here, in the Welding Advisers Website, Preview3, an extract from
Underwater Wet Welding - A Welder's Mate
Basic Techniques Used
For successful wet-welding, whether you are an experienced or novice welder, the first thing you have to accept is the range of personal skills which may be used for surface welding, do not exist for underwater.
Often when I speak to divers, I am asked if as a non-welder I can teach someone to weld to a satisfactory standard in two weeks. Well, barring any lack of basic co-ordination skills, the answer is yes.
Having trained well over a couple of hundred divers over the years, with the odd exception, it would be expected that a non-welder could achieve multipass fillet weldments in at least the horizontal-vertical and vertical down positions within this time frame.
Of greater surprise, is my usual reply to experienced surface welders. "Well it will depend up on whether you can disassociate yourself from accepted surface welding practice, quickly enough". "No problem" is the usual response. However, I have yet to meet the surface welder who can simply turn his hand to wet-welding techniques without some short term difficulties.
You see for an experienced surface welder, the range of skills and manipulative techniques he understands will work on surface, given a particular circumstance, offer little help underwater. He must accept that the range of personal skill and talent he has for surface welding, in the early stages of training, will do him no good at all when it comes to wet welding.
This is because the basic techniques of wet welding are in fact, very simple. There is simply no need for anything clever in producing a good underwater wet-weld. Simple is best.
The three basic techniques I teach for underwater wet-stick welding are as follows:
- Drag or self-consuming technique.
- Oscillation technique.
- Step-back technique.
All these are touch techniques. This is the basic principle of all underwater wet welding. Of course, as you become very much more competent you can and will start to deviate to styles of your own. It is true to say that touch techniques are not the only way in which wet welding can take place, but certainly at the basic/standard level, they are the only techniques required.
1. Drag
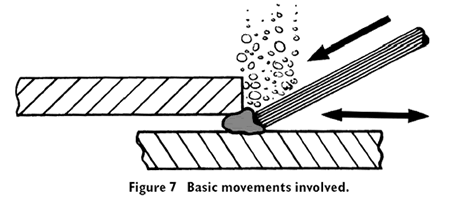
With the drag technique, the electrode is simply dragged across the work and the diver only has to apply a slight downward pressure, whilst the electrode is being consumed. Providing he maintains the appropriate lead and slope angle, together with a suitable travel speed, the electrode will produce a regular bead of suitable profile, almost on its own.
Perhaps it doesn’t sound that simple after all, with all those different things to master. Well it’s certainly not a difficult technique. Perhaps the most difficult thing most trainees find hard to master in the early stages isn’t so much the appropriate lead/slope angles, or the correct travel speed or even maintaining a touch technique.

By far the most common factor that causes most headaches is establishing the correct current. Because it's true to say, that no matter how well you attempt to control the above, without a suitable current, you are on a 'sticky wicket' (no win) and it can take you some time to recognise the correct current values.
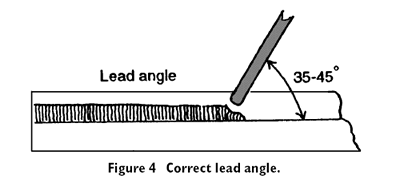
To allow for minor changes in travel speed, changing the lead angle is required. In general, the steeper the lead angle, the slower the rate of travel and the wider the weld bead and deeper the penetration.
For underwater wet welding a shallower lead angle than that used for surface welding is required, of between 35–45º. This is to allow for the bubbles to escape without unduly interfering with the weld puddle.
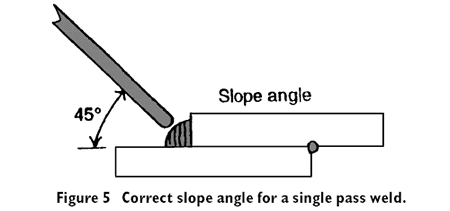
Another very important angle is the slope angle. This is used to enable accurate weld deposition within the joint. It must be understood that when using touch techniques the slope angle is the only mechanism that can be used to deposit weld metal in a particular location, and therefore, the use of slope angle control is vital.

The drag technique will be used initially by the novice. This will allow for a period of adjustment, as the information provided by the arc is somewhat confusing and in practice a constant contact technique is easier to maintain and will result in repeatable performance, allowing for greater control of quality.
As with all welding techniques however, there is a careful balance to address between all the senses, i.e. sight, sound and touch. This technique in particular is best used on the second pass of a multipass fillet weld, as usually, just a straightforward stringer bead is all that's required (see Figure 33).
For butt welds too, the drag technique is very well suited. Welding position has very little effect upon this particular technique (see welding exercise sheet for more guidance on all techniques). When welding is done using the drag technique, the weld metal is deposited in a series of beads or stringers, by dragging the electrode along the work. This technique is suited to both fillet and butt welds.
2. Oscillation
I have used this word for so long, I should perhaps advise you that it's not strictly speaking, a correct term/definition used for manual welding. However, I use it because then there's no misunderstanding between this and the better known term 'weaving'. I don’t use the term weave because it’s meaning is inaccurate. Underwater when using touch techniques, weaving isn’t used, although quite possible, isn’t needed.
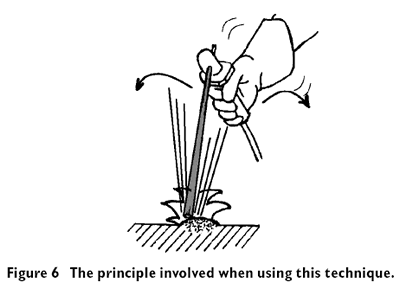
Right, now we have sorted that out, let’s look at what we do. With the oscillation technique the electrode is oscillated so that the point closest to the holder, and not the end closest to the work, is raised and lowered in a vertical direction, i.e. the slope angle is constantly changed whilst welding. This aids metal deposition and prevents non-concentric burning of the electrode, especially when welding in the root of a joint.

Concentric burning may be described as a uniform melting of the electrode, around it's entire circumference. Due to the slightly lower lead angles required for wet welding, and the fact that touch techniques are used, the electrode makes contact with only a small surface area.
This sooner or later results in the part closest to the workpiece burning a little faster than its opposite face. The result is non-uniform melting of the electrode, and the arc deflects to the point closest to the work.
At this stage, it's simply not possible to control the metal deposition or even see the arc properly. It may in certain circumstances be corrected by simply twisting your wrist, thereby, allowing the opposite side of the electrode to come into contact with the work piece, allowing the flux covering to catch up.
This particular technique is best used for the root run in fillet welded joints, because this is when the electrode is most likely to misbehave.
3. Step-back
Again, this word is not a term given in BS 499-1: 1991 welding terms and symbols. However, I use it because it does describe the technique accurately. This technique involves stalling the forward travel speed for a second and then travelling backwards, into the weld pool for a few millimetres.
This technique aids improvements to throat thickness and weld width, together with some improvements in the control of the solidification/cooling rate of the weld puddle. Both of these techniques however, demand a little more skill and experience on behalf of the diver, together with an understanding of the solidification pattern of the weld and its effects upon the material.
Suffice to say, it's a little more difficult due to the greater degree of control required. For fillet welds at least, this technique is very well suited for the last pass, of a three pass weld (see Figure 33).
This is because it will mop up any little mistakes caused by inaccurate weld placement of the second pass and allow in tidying the whole weld up. Accurate weld placement, no matter which technique is used, is another wet-welding difficulty that the trainee can expect.
If you take a quick look now at the exercise sheets, you will see that slope angle is the mechanism that controls just where the weld gets deposited. I am sure it won't surprise you to learn that it doesn't take much to make a complete hash of this.
Fillet welds are without doubt the most common joint type used for wet welding and this book deals predominately with them. However, butt welds can be accomplished just as successfully, although they aren't required anything like those of fillet welds.

In the welding metallurgy chapter you will see various weldments, both fillet and butt welds that have been completed successfully. As previously mentioned with underwater wet-welding electrodes, the flux covering extends beyond the end of the core wire, this helps prevent the end of the electrode from welding itself or sticking to the work and permits for an acceptable transfer of molten metal across the arc gap.
It should also be remembered that lead and slope angles, together with travel speed, are far more critical in underwater welding than surface welding, due to the visibility and environmental conditions, and as such, will take a little time for you to master.
* * *
Any questions or comments or feedback? Write them down and send them to us by e-mail.
Click on the Contact Us button in the NavBar at top left of every page.
Top
Note:
Welding Advisers hopes you enjoyed reading Preview3, an extract from the Book.
To order the book online click on A Welder's Mate.
The first book extract, Preview1, can be found by clicking on A Case for Wet Welding.
The second book extract, Preview2, can be found by clicking on Principles of Operation.